Easy Homemade Dog Paw Balm Recipes: Natural Protection Your Pup Deserves
Your dog’s paws work hard every single day. From morning walks on rough sidewalks to afternoon adventures through grass and gravel, those precious paw pads endure more than we often realize. When winter brings salt-covered streets or summer delivers scorching hot pavement, your furry friend needs extra protection to keep their paws healthy and comfortable.
Making your own homemade dog paw balm isn’t just a fun DIY project – it’s one of the most caring things you can do for your canine companion. With just a few natural ingredients you probably already have in your kitchen, you can create an effective paw protection that rivals expensive store-bought alternatives. The best part? You’ll know exactly what’s going on those precious paws.
Why Your Dog Needs Paw Balm Protection
Dog paw pads might look tough, but they’re surprisingly vulnerable to environmental damage. During winter months, road salt and ice melt chemicals can cause painful cracking and irritation. Summer heat turns asphalt into a paw-burning surface that can cause serious discomfort. Even regular walks on rough concrete gradually wear down the protective layers of your dog’s paw pads.
“Many dog owners don’t realize that their pet’s paw pads can become as dry and cracked as human hands during harsh weather conditions. A quality paw balm creates a protective barrier while moisturizing the skin, preventing painful splits and keeping paws comfortable year-round.”
— Dr. Sarah Mitchell, Veterinary Dermatologist
Signs your dog might benefit from regular paw balm application include visible dryness, small cracks in the paw pads, excessive licking of paws, or reluctance to walk on certain surfaces. The good news is that natural paw balm ingredients like coconut oil and shea butter can address these issues effectively while being completely safe if your dog decides to give their paws a taste.
The Best Natural Ingredients for DIY Dog Paw Balm
When creating homemade paw balm for dogs, choosing the right ingredients makes all the difference. The most effective natural ingredients work together to moisturize, heal, and protect your dog’s paw pads without causing harm if ingested during grooming.
Coconut oil forms the foundation of most excellent paw balm recipes. Its antimicrobial properties help prevent infections while its moisturizing effects soften tough, dry skin. Coconut oil also has a pleasant scent that most dogs don’t mind and melts quickly when warmed by your hands for easy application.
Shea butter brings incredible healing properties to your DIY paw balm. Rich in vitamins A and E, shea butter helps repair damaged skin while creating a protective barrier against future harm. Its thick consistency helps the balm stay put on active paws longer than thinner formulations.
Beeswax acts as the binding agent that gives your paw balm its solid form while adding waterproofing qualities. This natural wax helps your homemade balm maintain its consistency in various temperatures and provides long-lasting protection during outdoor adventures.
“The beauty of making your own dog paw balm lies in the simplicity and safety of natural ingredients. Coconut oil, shea butter, and beeswax have been used for centuries to heal and protect skin, and they’re just as effective for our four-legged family members.”
— Dr. Mark Thompson, Holistic Veterinarian
Simple 3-Ingredient Dog Paw Balm Recipe
This basic DIY dog paw balm recipe requires minimal ingredients and takes less than 30 minutes from start to finish. It’s perfect for beginners and creates enough balm to last several months with regular use.
Ingredients:
- 1/4 cup coconut oil
- 2 tablespoons shea butter
- 1 tablespoon beeswax pellets
Instructions:
- Set up a double boiler or place a heat-safe bowl over a pot of gently simmering water.
- Add beeswax pellets to the bowl first, as they take longest to melt completely.
- Once beeswax begins melting, add coconut oil and shea butter to the bowl.
- Stir continuously with a wooden spoon until all ingredients are completely melted and well combined.
- Remove from heat and let cool for 2-3 minutes, stirring occasionally.
- Pour the mixture into small tins or containers before it begins to solidify.
- Allow to cool completely at room temperature for about 1 hour before using.
Enhanced Paw Balm Recipe with Healing Oils
For dogs with particularly sensitive or damaged paws, this enhanced recipe includes additional healing ingredients that provide extra nourishment and repair benefits.
Ingredients:
- 1/4 cup coconut oil
- 2 tablespoons shea butter
- 1 tablespoon olive oil
- 1 tablespoon beeswax pellets
- 1 teaspoon vitamin E oil (optional)
Follow the same melting and mixing process as the basic recipe, adding the olive oil and vitamin E oil after removing from heat. The olive oil provides additional moisturizing benefits, while vitamin E oil acts as a natural preservative and adds extra healing properties.
“I always recommend starting with the simplest recipe first to see how your dog’s skin responds to the ingredients. Some dogs have sensitivities to certain oils, so introducing one ingredient at a time helps identify any potential reactions before they become problematic.”
— Dr. Lisa Rodriguez, Small Animal Veterinarian
Winter Paw Protection Recipe
When harsh winter conditions threaten your dog’s paw health, this specialized winter paw balm for dogs provides extra protection against salt, ice, and freezing temperatures.
Ingredients:
- 1/3 cup coconut oil
- 3 tablespoons shea butter
- 2 tablespoons beeswax pellets (extra for stronger barrier)
- 1 tablespoon sweet almond oil
This recipe creates a slightly firmer balm that adheres better to paw pads during snowy walks. The increased beeswax content provides enhanced protection against salt and chemical ice melts that can cause severe paw irritation.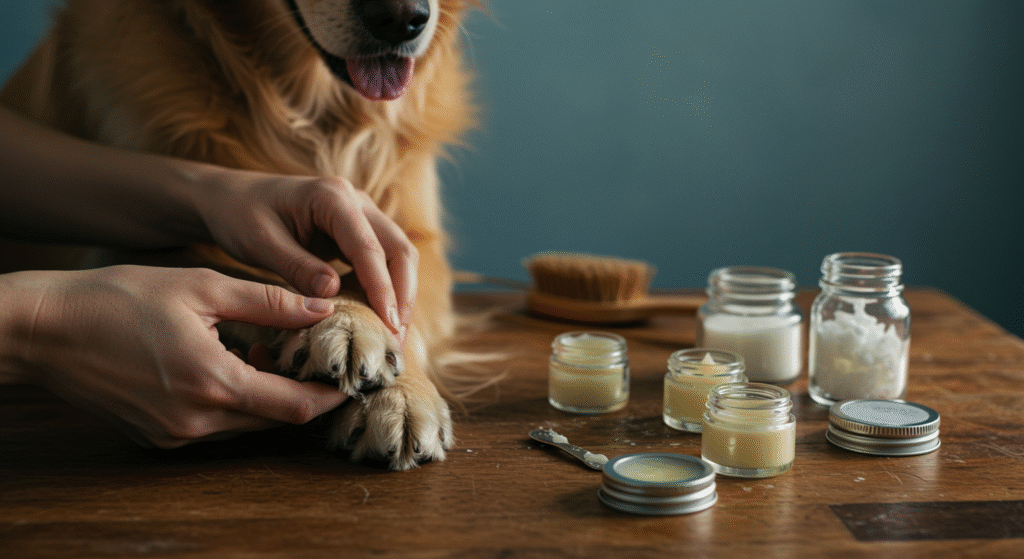
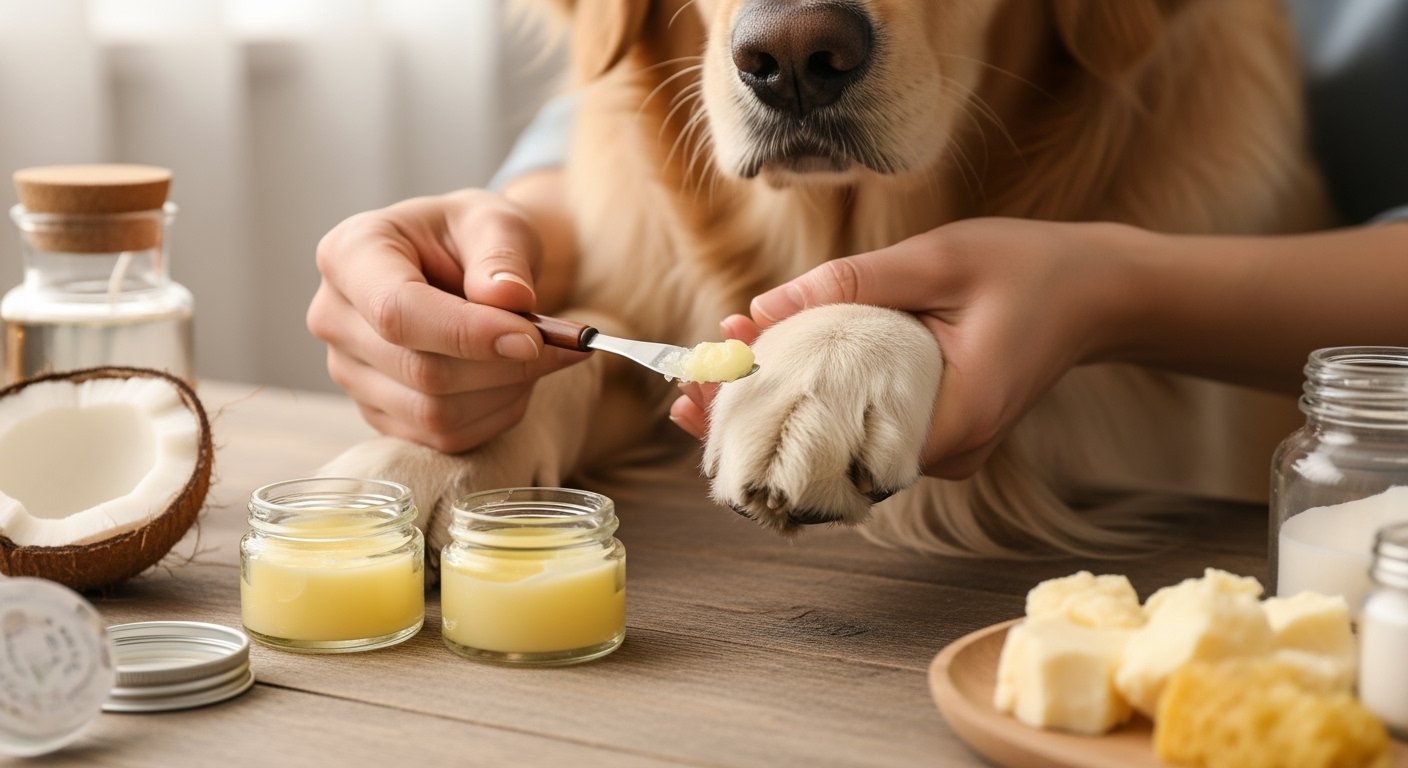
How to Apply Paw Balm Properly
Proper application technique ensures your homemade dog paw balm works effectively and your dog stays comfortable during the process. Start by gently cleaning your dog’s paws with a damp cloth to remove any dirt or debris.
Warm a small amount of balm between your fingers until it softens, then gently massage it into each paw pad using circular motions. Pay special attention to any areas that look dry or cracked, but avoid applying too much product as this can make paws slippery.
For best results, apply paw balm before bedtime when your dog will be less active, allowing the moisturizing ingredients to work overnight. You can also apply a thin layer before winter walks to create a protective barrier against harsh elements.
Storage and Safety Tips
Store your homemade paw balm in a cool, dry place away from direct sunlight. Properly stored balm should maintain its quality for 6-12 months. If you notice any changes in color, smell, or texture, it’s time to make a fresh batch.
“Always test a small amount of any new paw balm on one paw pad first and wait 24 hours to ensure your dog doesn’t have an allergic reaction. While natural ingredients are generally safe, individual sensitivities can occur with any topical product.”
— Dr. Jennifer Walsh, Emergency Veterinarian
Remember that these natural dog paw care products are made without preservatives, so they won’t last as long as commercial alternatives. Making smaller batches more frequently ensures you’re always using fresh, effective balm on your dog’s paws.
When to Seek Veterinary Care
While homemade paw balm effectively prevents and treats minor paw pad issues, some conditions require professional veterinary attention. Contact your vet if you notice deep cracks that don’t improve with balm treatment, signs of infection like swelling or discharge, or if your dog shows persistent limping or pain when walking.
Severe allergic reactions, burns from hot pavement, or cuts from sharp objects also need immediate veterinary care rather than home treatment. Your homemade paw balm works wonderfully for maintenance and minor issues, but it’s not a substitute for professional medical care when serious problems arise.
Making Paw Care a Routine
The most effective dog paw protection comes from consistent care rather than reactive treatment. Incorporate paw checks into your regular grooming routine, looking for signs of wear, cuts, or irritation before they become painful problems.
During extreme weather seasons, apply your homemade balm 2-3 times per week as preventive care. In milder conditions, once weekly application usually provides adequate protection for most dogs. Active dogs who spend lots of time outdoors may benefit from more frequent applications.
Creating your own safe paw balm for dogs connects you more closely with your pet’s health needs while providing peace of mind about what touches their skin. Your dog’s paws carry them through countless adventures – they deserve the natural, loving care that only homemade remedies can provide.
Your furry friend’s comfort and health start from the ground up. With these simple, natural recipes, you’re giving them the foundation they need for happy, healthy adventures together.